
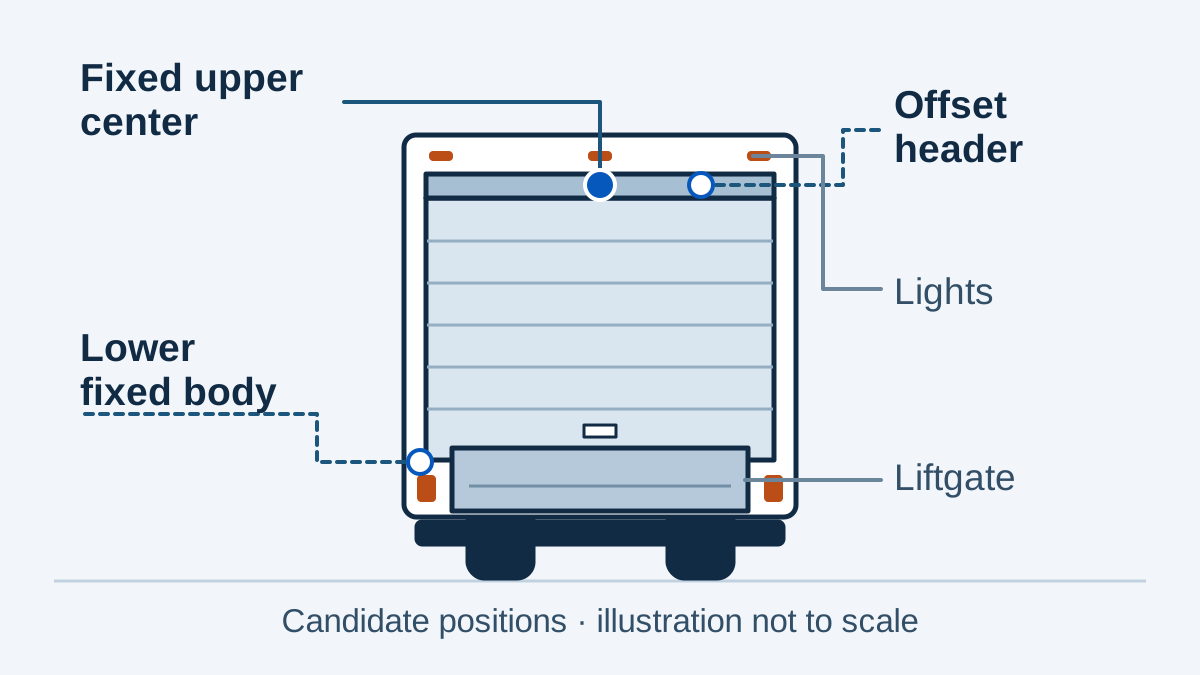
Start with the fixed upper header near the center of the rear opening. If the structure can support the bracket without blocking lights or interfering with the door, test the view from there before drilling.
Unlike a typical passenger-car retrofit, a box truck installation spans a tall cargo body and a separate cab. The door and liftgate can cross the camera's view, and moving door hardware can catch the cable. Check the mount, view and cable route together.
On this page
Key Takeaways
- Start with a central mounting point on the fixed structure above the door.
- Check cable clearance through the full travel of the roll-up door.
- Plan a protected cable route from the rear body to an approved cab entry.
Where Should You Mount a Rear Camera on a Box Truck?
Fixed upper header
A centered mount on the fixed structure above the door gives you a starting point for checking both rear corners. Inspect both sides of the header: a flat exterior can conceal framing, wiring or door hardware. Leave room to adjust the bracket and keep the marker lights clear. Rear View Safety's straight box truck guide shows an upper mount for its own kit.
When to consider an offset or lower mount
If a lamp or the structure rules out the center, try an offset on the fixed body and check whether you lose the far corner. A lower mount may help with near-ground visibility, but check spray exposure, loading contact and liftgate obstruction. On swing-door bodies, check the hinge and latch sweep. Compare candidate views on the intended display before committing.
How Roll-Up Doors Affect Camera Installation
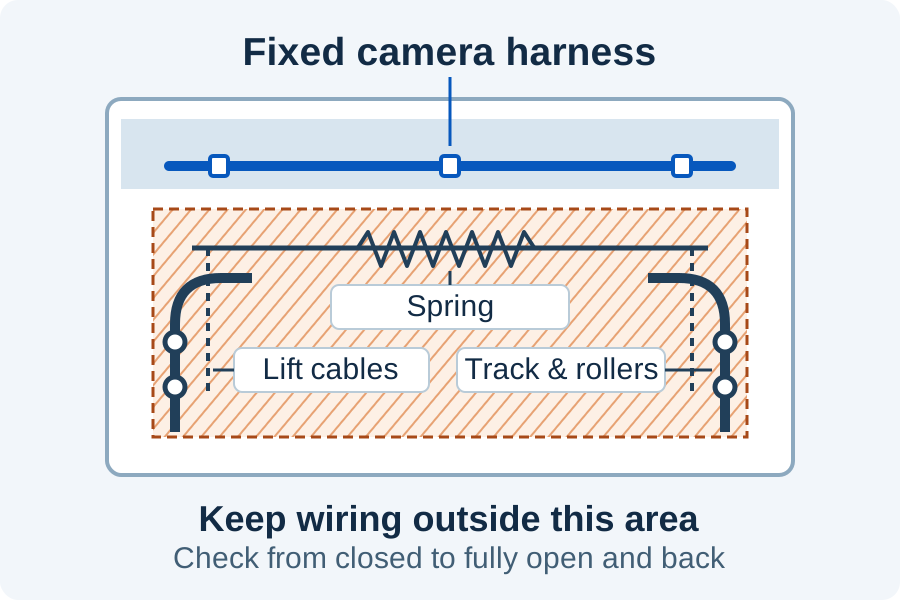
A cable that clears the door when shut can still catch as the door rolls back. With the truck secured, observe from a safe position as the door opens fully and closes again. Check the rollers, tracks, lift cables, counterbalance spring and brackets at intermediate positions too. Look for slack pulled toward a roller, a pinch point or a cable that tightens as the door moves. Check the liftgate through its own travel if fitted.
Keep the harness on fixed structure outside the full movement envelope. Use an approved channel or removable panel where practical, and protect exposed runs with suitable loom and fixed supports. Rostra's box-truck example documents how a spring can rub through camera-wire insulation. Keep the harness clear of tensioned door hardware.
How to Route Camera Cables from the Rear to the Cab
Map the route before ordering
Trace the path from the header through a protected part of the body, across an approved body-to-chassis transition and forward to an approved cab entry. Keep it out of cargo impact zones and clear of exhaust heat, sharp edges and moving suspension. Geotab's harness routing guide illustrates these checks for its own equipment. Measure the actual path, including bends, movement allowance and access for servicing. Check that the connector fits through each opening.
Protect each transition
Use an approved existing pass-through where practical. For an approved new opening, inspect both sides and follow the body builder's requirements for edge treatment, a suitable grommet and sealing. The grommet protects the cable from abrasion; the seal manages water entry. Support the loom so the connector does not carry its weight.
How to Adjust the Camera Viewing Angle
Watch the live image as you adjust the bracket. Aim for a small visible bumper edge and enough ground behind it to see the reversing area. Too much horizon can hide the ground nearest the truck; too much bumper can crowd out the approach to a dock.
Use stationary markers in a controlled area to check near-ground coverage, the rear corners and left/right orientation. Tighten the bracket and recheck from the driver's seat. The bumper gives the driver a repeatable reference; it does not calibrate distance. A listed lens angle cannot tell you what a liftgate or the body will obscure.
Choosing a Camera and Monitor for a Box Truck
The CAM-BT01 bus and truck camera is a candidate for an exterior rear mount. Consider the compact CAM-078 backup camera where space is limited. Both list a 170° viewing angle, DC 12V power and IP69K camera housings. Check the actual view on the truck. The housing rating does not cover connectors, cable entries or the finished installation.
Match the exact camera output to what the monitor input accepts. Both cameras list CVBS or AHD output and 4-pin aviation or RCA connector options. Verify the video mode, timing, harness pinout, power, ground and reverse trigger where used. An RCA plug alone tells you neither the video format nor whether the display accepts it.
The SUP-M700 7-inch vehicle monitor can be used with either CAM-BT01 or CAM-078 when the camera output, monitor input and harness are matched. The monitor has AV1 and AV2, AV2 priority, automatic reverse switching and RCA or 5-pin connector options. Confirm the ordered configuration and check reverse switching on the sample truck.
Installation Checklist Before Returning the Vehicle to Service
- Inspect the work. Check the bracket, lights, cable supports, connector strain relief and sealed pass-throughs. Cycle the door and liftgate and check for contact or pulling.
- Check the driver's view. Confirm the bumper edge, near ground and agreed approach area. Check orientation and ensure the screen does not block sightlines or controls. Keep using mirrors and site procedures.
- Test the display. With the truck secured, check for a stable image with the engine running. Where configured, verify that the rear view appears in reverse and the display returns to its intended state afterward.
- Approve a sample before rollout. Record the body and door configuration, exact parts, cable route and a frame from the installed display. Repeat the relevant checks when the body, liftgate, cab or wiring differs.
Frequently Asked Questions
Where should I mount a backup camera on a box truck?
Try a suitable fixed upper header near center first. Confirm clearance and the view before drilling.
Can I route the cable alongside a roll-up door track?
Only if the approved fixed route stays outside the moving hardware through a full cycle. Keep slack out of the track.
How much camera cable do I need?
Measure the installed path, including bends, transitions and service allowance. Check harness and connector clearance before ordering.
Should I see the bumper in the camera view?
Keep a small edge visible when the body allows it, while preserving the ground behind the truck.
Will a new rear camera work with my existing monitor?
Check the accepted input, camera output, pinout, power and trigger. Bench-test the exact parts; a matching plug is insufficient.
Plan Your Box Truck Camera Installation
For an OEM/ODM project review, share rear and inside-header photos, door and liftgate type, the view you need, cable route, available power, existing display input and quantity. Start with a representative truck before specifying the fleet order.